Last revised on 12/5/2023 by kek
Overview
The Center for Excellence in Teaching and Learning (CETL) offers syllabus templates that meets the Americans with Disabilities Act (ADA) requirements for online documents and is available for download in two formats. This post describes how to access the templates, along with some tips on ensuring the document remains accessible.
Once you have created your syllabus for an Online Asynchronous (OA), Online Blended (OB), or Online Synchronous (OS) course (only), you can submit the link to it via the Syllabus Link Submission form.
Accessing the templates
Templates for different course modalities are available for download as MS Word documents:
eCampus "Standard" Online Course template
Use for: Online Asynchronous (OA), Online Blended (OB), and Online Synchronous (OS)
CETL's general syllabus template
Use for: All other modes of delivery
View and download the appropriate template:
- Edit the document for your class and review it carefully removing the embedded template instructions.
- Remember to save your work.
See Managing Your Online Course for other tasks related to preparing to teach online.
We strongly recommend that you use OneDrive to host your syllabus file. This enables you to update the live document and have the correct version visible to students. Remember to set your file permissions so that they are viewable to anyone.
Tips When Linking to a file hosted on OneDrive
Be sure you are the owner of the document and set the share settings so "anyone with the link" can "view" the document. This enables students to view your syllabus without being logged into their OneDrive account. Review Share OneDrive Files Within Microsoft 365 Apps.
Tips When Creating a PDF Version
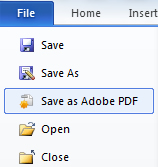
NOTE: If you are creating a PDF file (from the linked MS Word file), perform the steps below to make the document accessible. You can create PDFs in Word by using the Adobe Acrobat Add-in, by either choosing to Save as Adobe PDF from the File menu,
or by accessing the Acrobat Add-in ribbon and chose Create PDF.
NOTE: If you select to Print as PDF, the resulting document will NOT be tagged correctly for accessibility.
Accessible Word Document Features
-
- Headings - created using the Styles tool on the Home ribbon (NOT the Font tools).
- Alt tags for images - added by using the Format Picture feature (not an available feature in Word 2008 for MAC). Add the alt text to the Description field, not the Title field.
- Tables – row headers cannot be added in Word. Using Table Properties, you can select to Repeat as header on the top of each page. This will make the cells in the first row be display as table headers in your PDF.
- Links – edit displayed text to be easily understood by reader (do not leave full url as displayed text).
Other Tips for Accessibility
-
- Use the list tools to create bulleted or numbered lists.
- Use a font of at least 12 points.
- Be careful with colors. Use high contrasting colors. If color is used for meaning, another way to convey meaning should be included.
- Use the column tool to create columns, not tables or tabs.
- Use a table of contents when your document is long.
You can check the accessibility of your Word 2010/2013 document by accessing the File menu, selecting Info, Check for Issues, Check Accessibility. If any accessibility issues are found, follow the recommendations to correct them.
Related
- Syllabus Link Submission page
- Add or update your syllabus in HuskyCT
- Providing Syllabus Links to eCampus for Online Course Listing Pages
- Managing Your Online Course


